- BATH
Your choice of artisan sinks for the bath
- KITCHEN & BAR
Artisan sinks for the finest kitchens and bars
- FAUCETS
- VANITIES
- ON SALE
- GUIDES & INFO
Our most helpful resources for owning artisan crafted pieces
- SHOP WITH CONFIDENCE
- Eco-Friendly
- Testimonials
Free Shipping on Orders of $100 or more
You have no items in your shopping cart.
How to Install a Vessel Sink
A vessel style sink can be installed sitting on the countertop (above counter mounting) or sunk into the counter at varying heights (drop-in mount).
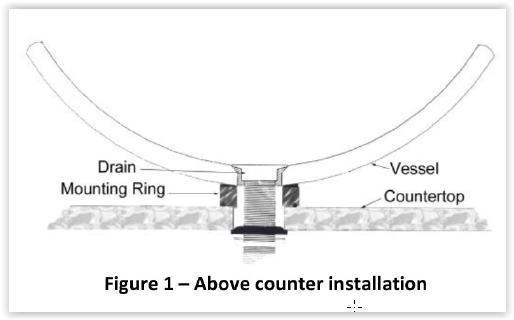 For above counter installation, you will need to cut a hole in the counter top large enough to accommodate the entire drain assembly, but small enough that it is hidden by the base of the sink. If the bottom of your vessel is flat, installation is straightforward. For this type of sink we recommend applying a bead of silicone under the vessel and around the edge to prevent water from working its way under the sink.
If the sink has a rounded bottom, as with most glass vessels, you have two options. You can use a mounting ring (see Fig. 1), or you will need to cut a mounting hole directly in the countertop.
Mounting rings are available at most home centers or online, and come in finishes to coordinate with your faucet and drain. A mounting ring elevates and helps stabilize the sink.
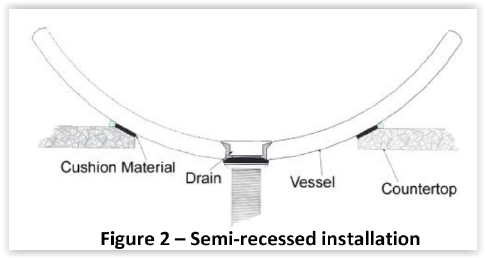 If you want to mount the vessel directly into the counterop in a semi-recessed installation, you will need to cut a beveleled hole 3" to 4" in diameter in the countertop. (See Fig. 2) If the vessel is larger, the hole should be 5" to 6" for greater stability. To lower the level of the sink, simply enlarge the hole.
To find the right size to cut the hole, experiment with a piece of cardboard. Cut a hole 3" in diameter in the cardboard. Place this template under the sink for a rough visualization of where the sink will sit in a hole that size. Work your way up in size until you find the perfect placement for your sink.
Be sure to keep the height of your faucet in mind during this experiment.
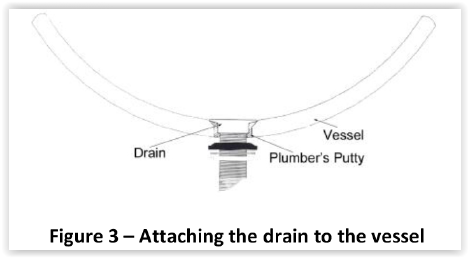
Whichever mounting method you use, you must attach the drain to the vessel before installing the sink into the counter surface.
Drains for vessel sinks come in overflow and non-overflow types. If your vessel has an overflow you will need a standard drain. However, most vessels do not have an overflow and require a vessel drain. Vessel drains come in many styles and finishes. The grid drain has a grid finish plate which lets the water flow out of the basin while preventing larger objects from heading down the drain. Pop up drains allow you to fill your sink with waer and can be used with most vessel sinks. However this drain type is not recommended for glass sinks.
 A SPECIAL CAUTION FOR GLASS VESSEL SINKS
When installing a glass vessel there are two special techniques you must follow.
First: Be sure to provide a cushion between the glass and the counter. This can be a bead of silicone, or a specialized rubber liner placed between the hole in your counter and the bottom of your sink. If you use silicone, allow the bead to dry before installing the sink. The bead will act as a cushion between the sink and the countertop material. Once the sink is in place, seal the join from the top and the bottom with another application of adhesive.
Second: You must not over-tighten the drain assembly when you attach it to the sink. Tighten the drain by hand only, never use a wrench.Over-tightening will subject your glass sink to stress and very likely cause cracking, if not immediately, then at some time in the future. The breakage we see with glass vessels is almost always associated with an improper installation of the drain or as a result of thermal shock due to a rapid change in water temperature.
ABOUT ARTISAN CRAFTED
CONTACT US


